Looking to add a touch of charm and character to your kitchen? Dive into the world of DIY shiplap kitchen islands! Discover the basics, materials needed, and a step-by-step guide to build your very own island.
Plus, get inspired with customization ideas and tips on maintenance and care. Let’s create a space that’s not only cost-effective but also uniquely yours. Ready to roll up your sleeves and get crafty? Let’s dive in!

About Shiplap Kitchen Island
So, what exactly is a shiplap kitchen island? In simple terms, it’s a kitchen island constructed using shiplap – wooden boards that overlap to create a rustic, yet modern look. The appeal of DIY shiplap kitchen islands lies not only in their aesthetic value but also in the satisfaction derived from creating something with your own hands.
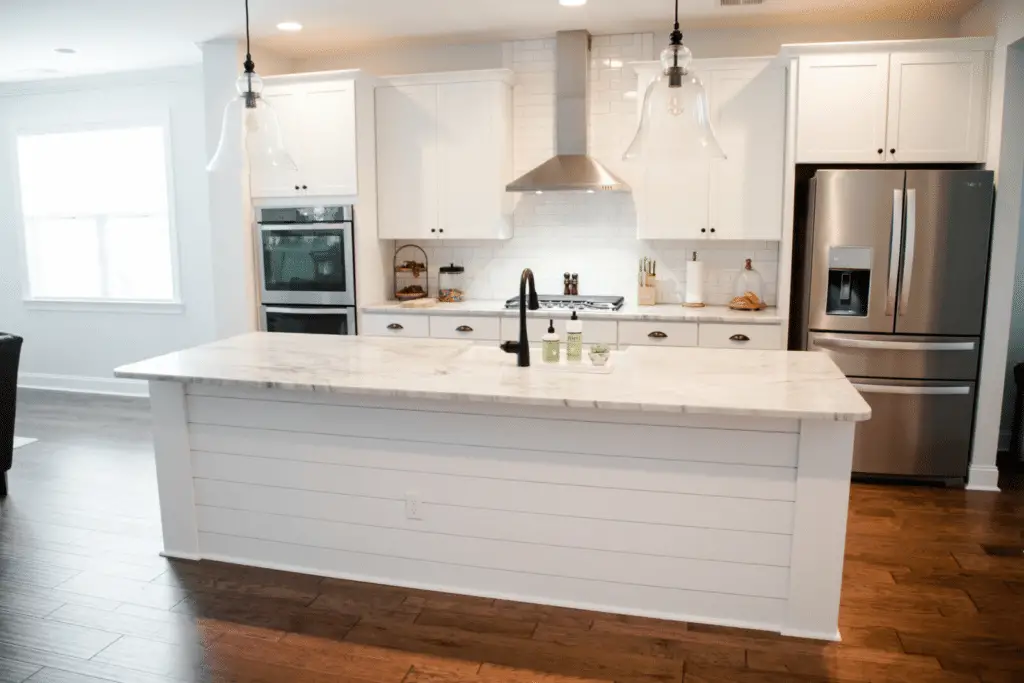
One of the main reasons why DIY shiplap kitchen islands have soared in popularity is their cost-effectiveness. By opting for a DIY approach, you can save a significant amount of money compared to purchasing a pre-made island. Additionally, the sense of accomplishment that comes from completing a DIY project is unmatched.
Key Takeaways:
- Shiplap kitchen islands are constructed using wooden boards that overlap to create a rustic, yet modern look.
- The appeal of DIY shiplap kitchen islands lies in their aesthetic value and the satisfaction of creating something with your own hands.
- DIY shiplap kitchen islands are cost-effective and offer a sense of accomplishment upon completion.
Materials Needed for Shiplap Kitchen Island DIY
When it comes to embarking on a DIY project like building a shiplap kitchen island, having the right tools and materials is crucial to ensure a successful outcome. Not only will the proper supplies make the construction process smoother, but they will also contribute to the longevity and durability of your finished island.
Essential Tools
Before you get started on your shiplap kitchen island DIY project, make sure you have the following tools on hand:
- Saw
- Hammer
- Measuring tape
- Level
- Nail gun
- Sanding block or electric sander
- Paintbrush or paint sprayer
- Safety goggles and gloves
These tools will allow you to cut, assemble, and finish your shiplap island with precision and efficiency.
Materials
Now, let’s talk about the materials you’ll need for your shiplap kitchen island DIY:
- Shiplap boards
- Plywood or lumber for the frame
- Construction adhesive
- Nails or screws
- Wood filler
- Primer and paint or stain
- Decorative hardware (optional)
These materials are the building blocks of your shiplap kitchen island and will determine its overall appearance and structural integrity. When choosing shiplap boards, opt for high-quality wood that can withstand the wear and tear of a busy kitchen environment.

As for the estimated cost of these tools and materials, it may vary depending on your location, the quality of the products you choose, and the size of your kitchen island. On average, expect to spend between $200 and $500 for everything you need to complete your shiplap kitchen island DIY project.
By investing in the right tools and materials upfront, you’ll be setting yourself up for success and ensuring that your DIY shiplap kitchen island stands the test of time.
Step-by-step Guide to Building a Shiplap Kitchen Island DIY
So, you’ve decided to take on the challenge of building your own shiplap kitchen island – kudos to you! This step-by-step guide will walk you through the process, from the initial planning stages to the final touches. Let’s get started!
1. Plan and Design
Before picking up any tools, it’s essential to have a clear plan and design for your shiplap kitchen island. Decide on the size, shape, and layout that will best fit your kitchen space. Consider factors like storage needs, seating options, and functionality.
2. Gather Materials and Tools
Once you have a solid plan in place, it’s time to gather all the necessary materials and tools. You’ll need shiplap boards, a saw, nails, a hammer, sandpaper, paint or stain, and any other embellishments you want to add to personalize your island.
3. Construct the Frame

Start by building the frame of your shiplap kitchen island. Use the saw to cut the boards to the desired lengths and assemble them according to your design. Make sure the frame is sturdy and level before moving on to the next step.
4. Install the Shiplap
With the frame in place, it’s time to add the shiplap boards. Begin at one end of the island and work your way across, ensuring each board is level and securely attached. Use nails and a hammer to secure the boards in place.
5. Finishing Touches

Once the shiplap is installed, it’s time for the finishing touches. Sand down any rough edges, apply a coat of paint or stain in the color of your choice, and add any decorative elements or hardware to complete the look of your shiplap kitchen island.
6. Pro Tips and Tricks
As you work through the construction process, keep these pro tips and tricks in mind to ensure a smooth and successful build:
– Measure twice, cut once to avoid mistakes
– Use a level to ensure your island is straight and even
– Sand between coats of paint or stain for a professional finish
– Add a protective sealant to prevent damage from spills and everyday wear and tear
By following these steps and tips, you’ll be well on your way to creating a beautiful shiplap kitchen island that will be the centerpiece of your kitchen for years to come!
Customization Ideas for Shiplap Kitchen Island
When it comes to creating a shiplap kitchen island, the opportunities for customization are endless. This is where you get to showcase your personality and design preferences, turning a simple kitchen island into a unique focal point in your home. Let’s explore some creative ideas to make your shiplap island stand out:
1. Color Themes
One of the easiest ways to personalize your shiplap kitchen island is by choosing a color scheme that complements your kitchen. Whether you prefer a classic white shiplap for a farmhouse look or a bold pop of color for a modern touch, the choice is yours. Consider painting the island in a hue that ties in with your kitchen’s overall aesthetic.
2. Patterns and Textures

Adding patterns and textures to your shiplap island can enhance its visual appeal. Consider incorporating geometric designs, herringbone patterns, or even a distressed finish for a rustic vibe. These intricate details can elevate the look of your island and make it a true conversation piece in your kitchen.
3. Unique Storage Solutions
Maximize the functionality of your shiplap island by incorporating unique storage solutions. From built-in shelves and cabinets to hanging hooks and hidden compartments, there are plenty of ways to make your island both stylish and practical. Think about your specific storage needs and customize the island to meet them.
By embracing these customization ideas, you can transform your DIY shiplap kitchen island into a one-of-a-kind masterpiece that reflects your personal style and enhances the overall look of your kitchen.
Maintenance and Care for Your Shiplap Island
Now that you’ve successfully built your DIY shiplap kitchen island, it’s important to know how to maintain and care for it to ensure its longevity and continued beauty. Proper care and maintenance will not only keep your island looking great but will also prevent any unnecessary wear and tear that may require repair down the line.
Guidelines for Preserving the Beauty of Your Island
One of the key aspects of maintaining your shiplap kitchen island is regular cleaning. Dust and debris can easily accumulate in the grooves of the shiplap, so it’s essential to dust and wipe down the island on a regular basis. Use a soft cloth or microfiber towel to gently clean the surface and remove any dirt or grease buildup.
It’s also important to avoid using harsh chemicals or abrasive cleaners on your shiplap island, as these can damage the wood finish and compromise the integrity of the shiplap. Instead, opt for a mild soap and water solution to clean the surface, being sure to dry it thoroughly afterwards to prevent any water damage.
Handling Common Repair Issues
Despite your best efforts to maintain your shiplap kitchen island, there may be times when repairs are necessary. Common issues that may arise include chipped or peeling paint, loose shiplap boards, or water damage.

If you notice any paint damage, simply sand down the affected area and repaint it to match the rest of the island. For loose shiplap boards, use wood glue or nails to secure them back in place. For water damage, identify the source of the issue and fix it promptly to prevent further damage to your island.
Regularly inspecting your shiplap island for any signs of wear and tear will allow you to address any issues before they escalate into more significant problems, saving you time and money in the long run.
By following these maintenance and care guidelines, you can ensure that your DIY shiplap kitchen island remains a functional and beautiful centerpiece in your kitchen for years to come.
Happy Crafting and Cooking!
Now that you’ve mastered the art of creating your own shiplap kitchen island, it’s time to enjoy the fruits of your labor. The satisfaction of building something with your own hands is truly priceless. Remember, a shiplap kitchen island isn’t just a piece of furniture, it’s a statement of your creativity and personality in your kitchen.
So, gather your tools, unleash your creativity, and get ready to craft a functional masterpiece that will bring joy to your cooking adventures for years to come. Happy crafting and cooking!


