
Hey there! Ready to transform your kitchen island with a fresh new look? In this blog post, we’ll guide you through the step-by-step process of painting and finishing your kitchen island molding.
From preparations and choosing the right color to mastering the art of finishing and avoiding common mistakes, we’ve got you covered. Stay tuned for expert tips on maintaining the quality of your painted and finished molding. Let’s dive in and give your kitchen a stylish upgrade! #KitchenIslandMakeover 🎨🏝️


Proper Preparation Before Painting

Before you start painting and finishing your kitchen island molding, take the time to prepare the surface properly. This includes cleaning the molding to remove any dirt, dust, or grease that may affect the paint adhesion. Sanding the surface lightly can also help create a smooth base for the paint to adhere to. Additionally, make sure to use painter’s tape to protect surrounding surfaces and achieve clean paint lines.
Quality Tools and Materials Matter
Investing in quality tools and materials is crucial for the success of your painting project. High-quality brushes and rollers can make a significant difference in the final outcome. Additionally, choosing the right type of paint for your kitchen island molding is essential. Consider using a semi-gloss or high-gloss paint for durability and ease of cleaning in a high-traffic area like the kitchen.
Choosing the Right Color for Your Kitchen Design
One of the most exciting parts of painting your kitchen island molding is choosing the color that complements your overall kitchen design. Whether you opt for a classic white finish for a timeless look or a bold color to make a statement, consider the existing color scheme and style of your kitchen. Remember, the color you choose can significantly impact the overall aesthetic of the space.
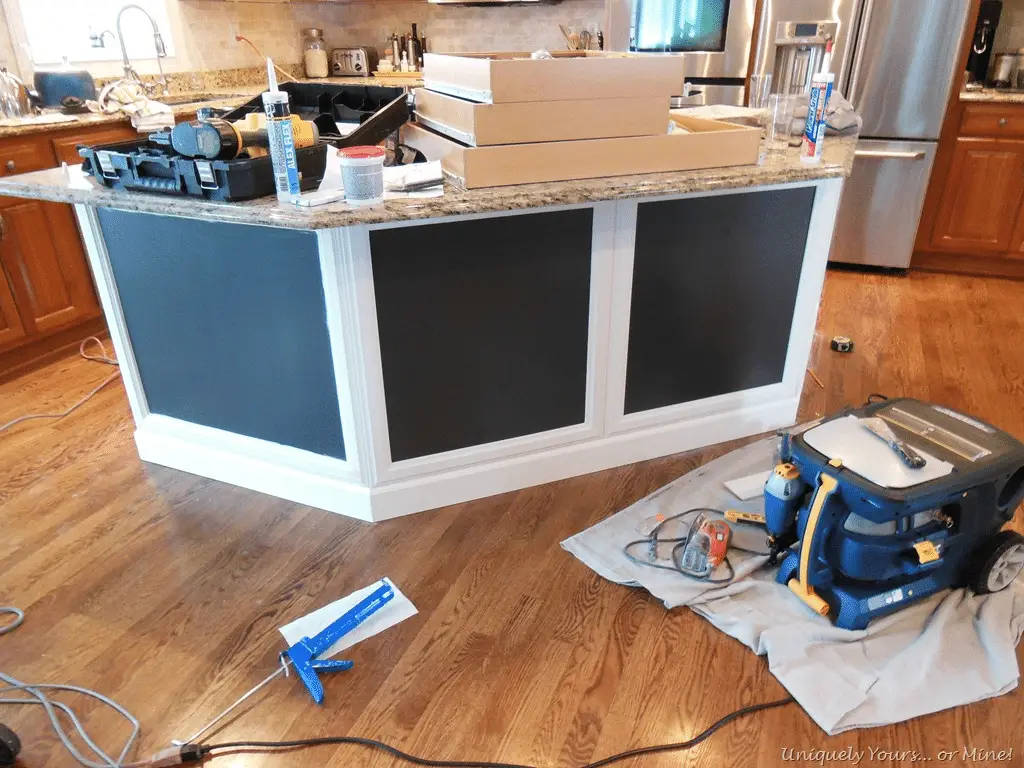
Step-by-Step Guide: How to Paint Your Kitchen Island Molding

After properly preparing your kitchen island molding for painting, it’s time to start the exciting process of transforming its appearance. With the right tools and techniques, your molding will soon become a focal point in your kitchen design.
Detailed Process Description of Painting Molding

Begin by applying a primer to the molding, ensuring even coverage and allowing it to dry completely before moving on to the next step. Once the primer is dry, it’s time to paint your molding with your chosen color. Use smooth brush strokes to avoid streaks or uneven coverage. Multiple thin coats are preferable to one thick coat to achieve a professional finish.
Necessary Precautions During the Process
It’s essential to work in a well-ventilated area when painting to avoid inhaling fumes from the paint. Additionally, protect your surrounding surfaces from accidental spills or splatters by using drop cloths or masking tape. Be mindful of the drying time between coats to prevent smudges or imperfections in the finish.
Importance of Patience for the Best Outcome

Patience is key when painting kitchen island molding. Rushing the process can lead to mistakes or subpar results. Allow each coat of paint to dry thoroughly before applying the next one. Taking your time and paying attention to detail will ultimately lead to a beautifully painted finish that enhances your kitchen space.
Emphasizing the Use of Appropriate Brush Strokes
Using the correct brush strokes is critical for achieving a smooth and professional finish on your molding. Work in the direction of the wood grain to maintain a cohesive look. Avoid applying too much pressure on the brush, as this can create visible brush marks in the paint. Take care to blend each stroke seamlessly for a flawless result.
Mastering the Art of Finishing Kitchen Island Molding
Once you have successfully painted your kitchen island molding, the next step is to master the art of finishing. Different types of finishes can be applied to give your molding a professional look that complements the overall kitchen design.
Introduction to Different Types of Finishes
Before you start applying the finish, it’s important to understand the different types available. Some common options for finishing kitchen island molding include gloss, satin, and matte finishes. Gloss finishes are reflective and durable, satin finishes offer a subtle sheen, while matte finishes provide a flat, non-reflective appearance. Consider the style and color of your kitchen when selecting the appropriate finish.
Tips for Applying Finish for a Professional Look
When applying the finish to your kitchen island molding, ensure that you have a clean and dust-free surface. Use a high-quality brush or foam applicator to apply the finish in smooth, even strokes. Work in small sections to prevent drips or uneven coverage. Allow each coat to dry completely before applying the next one. For a professional finish, consider applying multiple thin coats rather than one thick coat.
Maintenance Advice for Sustaining the Finish Quality
After you have finished applying the desired finish to your kitchen island molding, it’s important to maintain its quality over time. Regular dusting and cleaning with a gentle cleaner can help preserve the finish and keep it looking fresh. Avoid using abrasive cleaning products or scrubbing the finish too hard, as this can damage the surface. If you notice any chips or scratches, consider touching up the finish with a small brush to keep it looking its best.

Mastering the art of finishing kitchen island molding is a key component of completing your DIY kitchen project. By choosing the right finish, applying it correctly, and maintaining it properly, you can ensure that your painted and finished molding adds a stylish and polished touch to your kitchen for years to come.
Common Mistakes and How to Avoid Them
As you embark on the journey of painting and finishing your kitchen island molding, it’s essential to be aware of the common mistakes that many DIY enthusiasts fall into. By recognizing these pitfalls and learning how to avoid them, you can ensure a smooth and successful project completion.
Skipping the Preparation Phase
One of the most common mistakes when painting and finishing kitchen island molding is skipping the preparation phase. Properly preparing the surface before painting is crucial for achieving a flawless finish. Make sure to sand the molding, fill any holes or gaps, and prime the surface before applying the paint or finish. Taking the time to prepare adequately will result in a more professional-looking outcome.
Using Low-Quality Tools and Materials
Another mistake to avoid is using low-quality tools and materials for the project. Investing in high-quality brushes, rollers, paint, and finish will not only make the job easier but also ensure a more durable and long-lasting result. Cheap materials can lead to uneven coverage, brush strokes, and premature wear and tear, ultimately costing you more time and money in the long run.
Rushing the Process
Patience is key when it comes to painting and finishing kitchen island molding. Rushing the process by applying too many coats of paint or finish too quickly can lead to drips, streaks, and an uneven finish. Allow each coat to dry completely before applying the next one, and follow the manufacturer’s instructions for the recommended drying times. Taking your time and allowing each layer to cure properly will result in a smooth and professional-looking finish.
Ignoring Proper Technique
Proper technique is essential for achieving a flawless finish when painting and finishing molding. Using appropriate brush strokes, working in small sections, and maintaining a consistent pressure while painting or finishing are crucial for a professional result. Take the time to learn and practice the right techniques for the job, and don’t be afraid to ask for help or advice if you’re unsure. A little extra effort in mastering the right techniques will pay off in the final outcome of your project.
By being aware of these common mistakes and taking the necessary precautions to avoid them, you can ensure a successful and satisfying experience when painting and finishing your kitchen island molding. Remember, patience, preparation, and proper technique are the keys to achieving a beautiful and long-lasting finish for your DIY project.
Final Touches and Maintenance of Your Painted and Finished Kitchen Island Molding

After completing the painting and finishing of your kitchen island molding, there are some final touches and maintenance tips that can help prolong the life and aesthetics of your project.
1. Providing Proper Curing Time
Once you have finished painting and applying the finish to your kitchen island molding, it is crucial to allow the appropriate curing time before putting any items or decorations back on the surface. Typically, the curing time can vary depending on the type of paint and finish you used. Make sure to follow the manufacturer’s recommendations for the best results.
2. Tips on Maintaining the Aesthetics
To maintain the aesthetics of your painted and finished kitchen island molding, regular cleaning is essential. Use a soft cloth or sponge with mild soap to gently wipe down the surface, avoiding abrasive cleaners that can damage the paint or finish. Additionally, be mindful of any spills or splatters and address them promptly to prevent staining.
3. Advice for Simple Touch-Ups
Over time, wear and tear may occur on your painted and finished molding, especially in high-traffic areas. To prolong the life of the paint and finish, keep a small amount of touch-up paint or finish on hand for quick fixes. By addressing any minor damages promptly, you can prevent them from worsening and extend the longevity of your project.
By following these final touches and maintenance tips, you can ensure that your painted and finished kitchen island molding remains in top condition for years to come. With proper care and attention, your DIY kitchen project will continue to enhance the overall design and aesthetic appeal of your space.
Parting Words: Mastering the Art of Kitchen Island Molding
As you venture into the realm of painting and finishing kitchen island molding, remember: preparation is key, patience is a virtue, and quality tools are your best friends. Choose colors wisely, apply finishes professionally, and avoid common mistakes for a flawless result. And don’t forget, a little maintenance goes a long way in preserving the beauty of your masterpiece. So, roll up your sleeves, grab that brush, and let your kitchen island shine!